If you’re running Debian family system and frequently putting your system to sleep, you might have encountered an issue where CUDA becomes unavailable after the computer wakes up. This happens because the NVIDIA uvm (Unified Virtual Memory) module doesn’t reload automatically on resume. While rebooting the computer resolves the issue, it’s not an ideal solution for day-to-day use.

In this article, I’ll walk you through an automated solution to ensure that your NVIDIA uvm module is reloaded every time your system wakes up—without any manual intervention.

The Problem

On many Debian systems, especially those using systemd, the NVIDIA drivers include a sleep script located in the /lib/systemd/system-sleep/ directory called nvidia. This script manages certain NVIDIA-related tasks when your computer suspends and resumes. However, it does not handle the reloading of the nvidia_uvm module, which is critical for CUDA functionality.

The workaround many users apply is to manually run:

sudo modprobe -r nvidia_uvm && sudo modprobe nvidia_uvm

after waking up the system. But why do it manually every time when we can automate the process?

The Automated Solution

Systemd provides a convenient mechanism to execute scripts during sleep and wake cycles. Scripts placed in /lib/systemd/system-sleep/ are executed in lexical (alphabetical) order. By naming our script appropriately, we can ensure that it runs after the existing NVIDIA sleep script.

Step 1: Create Your Script

Create a new file in the /lib/systemd/system-sleep/ directory with a name that sorts after the NVIDIA script. For example, naming it nvidia-uvm.sh ensures it runs later in the sequence:


 [ . . . ] 

Czytaj dalej...

On Linux, we can create a configuration files for devices and add them to XOrg configuration folder. After that we will be able to use mouse trackball ball + additional button to scroll page vertically or horizontally.

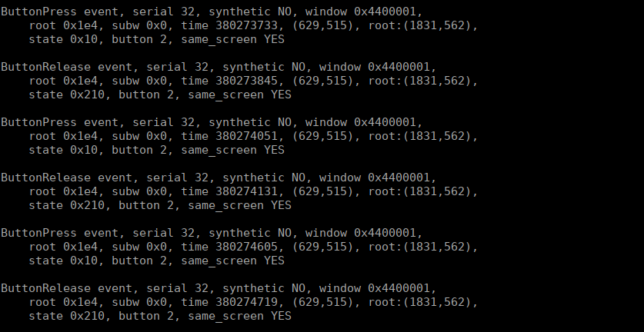
First we need to select which button we would like to use with our ball. For me best button is scroll wheel because I can easy access this button. I tested my mouse using command xev which allow to check which button was pressed and which ID is assigned to this button. I used sleep command because all my windows are opened in full screen mode. xev was executen in terminal on other desktop (which is on other monitor) and GUI application was visible on second monitor. This way I was able to see live output in terminal:

MX Ergo Scroll wheel button ID is 2 which is in last line as “button 2”. I’ll use it as a <BUTTON ID> in next steps. I don’t know which ID is for M570 but you can check yourself and change it in configuration.

MX Ergo Button ID:
1 – left mouse button (pressed)
2 – mouse wheel down (pressed) (my preferred)
3 – right mouse button (pressed)
4 – wheel up (move up)
5 – wheel down (move down)
8 – button no. 2 (pressed) (check bottom picture)
9 – button no. 1 (pressed) (check bottom picture)

Other buttons don’t have ID’s or xev was unable to recognize them.

File content for Logitech M570:


 [ . . . ] 

Czytaj dalej...

Tak... troszkę z tym tytułem za grubo pojechałem ale powiedzmy sobie szczerze - kto lubi obsługiwać pocztę za pomocą interfejsu webowego? No właśnie, a skoro tu jesteś to pewnie lubisz to tak samo jak ja - nie ma innej opcji - to musisz sprawdzać. A gdyby tak za pomocą magicznej klawiatury i myszki zamienić ten koszmar w piękną rzeczywistość? Przedstawiam wam prosty sposób na Exchange! 🙂

Czytaj dalej...